How to write a post — Sabera Chowdhury

  • First step, Make sure to log into my commons account with your user name and password. In CUNY Academy Common page, find the course directory and you search by course name such as Women gender.
  • Second step, you will see Intro to Women, Gender and Sexuality Studies but make sure semester: Fall 2021 and the instructor name is Gwen Shaw. Then click the site which is Intro to Women, Gender and Sexuality Studies (Public site).
  • Third step, then you will see page clicks Tuesday only 5:05 pm. After you click, you will see this page which will be in assignments, you have to check to see what has been posted by your instructor and follow the instructions for task assignment. Make sure you read this carefully.
  • Fourth step, on the left hand above the menu, you will see “+New”. Click on this icon and then click ”Post”.
  • Fifth step, You can start adding your title, write about the assignment  which was assigned by your Professor and add an image and other links.

  • Final step, Make sure you check your writing so that it falls under the guidelines which has been asked for the assignment

How to make a post

By: Llenifer Trejo Nunez

Creating a post is quite simple follow the steps below.

  1. Ensure you are on the WGS 1001 section site of the commons for the Tues/Thurs 9:30 a.m section for Professor Shaw.

2. Also be sure you are logged in and to join this site

3. The next step is to simply click the plus sign which says new. Upon clicking new it will give you a few options.

4. Click post and start typing what you want to post and you can insert any images by clicking the plus sign just tapping or hovering with your mouse where you post. This is also known as adding a block.

5. The last step is to either save your draft or publish it.

How to Make a Post – Samina

  • Open the link to our course page here.
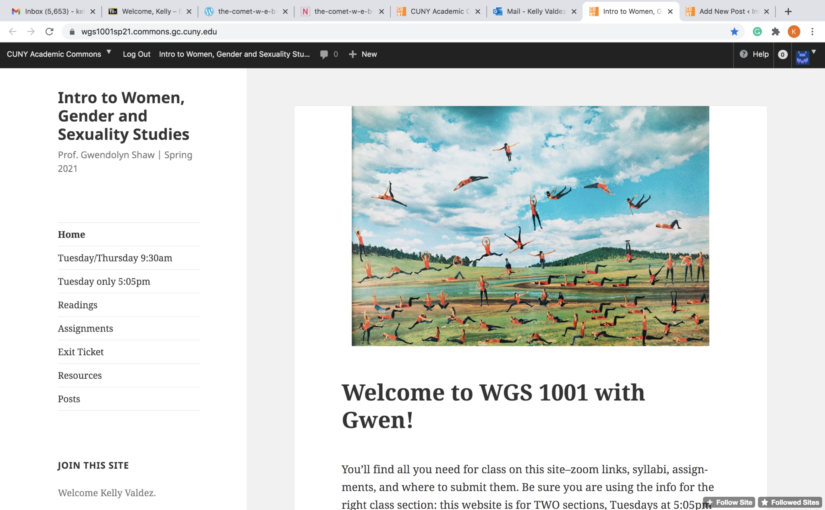
  • Select our class time as shown below “Home”:
  • Make sure you joined the site. If you have not, you won’t be able to get the option to create a post.
  • Now that you are active on the site, on the top left corner you will see a black banner with different options. Select “+NEW” and then “Post”
  • On this new page, you will be given several prompts on how to create a post.
  • Select the “+ Add Block” option on the top left corner. Now, you can find helpful options for how you choose to visually set up your post. Some examples are shown below:
  • Make sure to select “Save Draft” if you’re not done with your post.
  • If you are done with your post, you will need to set up a featured image for your post. Select here on the side bar and upload an image of your choice:
  • Now you can go ahead and select to publish your post!

How to Write a Post

  1. Log onto the Commons website with your username and password.
  2. Once on the Common site, make sure that you are in the right course with the correct weekday and time that corresponds with your Intro to Women, Gender and Sexuality Studies class.
  3. Once you’re sure that you’re in the correct class, click on assignments located in the menu.
  4. Once you’re in assignments, check to see what has been posted by your instructor and follow the instructions for the particular task assigned. Read this carefully.
  5. Above the menu, you will see “+New”, click on this and then click “Post”.
  6. You will now be able to add a title, write the assignment you have, and add a featured photo.
  7. Make sure your post is clear, grammatically correct, and is following the guidelines of the assignment.

Instructions, how to Write A Post

  1. Enter common (register first if not already)
  2. On the top of the site, you will see a black banner.
  3. You must click on “New” and below will appear three more options.
  4.  You must click the “post” option.
  5. You will be brought to a page where you will add a title and the main body section.
  6. Here you will write the complete contents of your post.
  7. You will have options for the format of your post. It may be a paragraph format or a list format, etc.
  8. In order to publish your post, you are required to have a featured image.
  9. To add a featured image, on the right side of your device, click on the “Document” tab.
  10. After clicking on the “Document” tab, there is a drop-down option titled “Featured image,” which you must select.
  11. Once done, select the image that bests represents your post. You may also select an image from your own computer or laptop if you so wish.
  12. Click the preview post option in order to make sure you are content with what you have written. Keep in mind that every blog post must have anywhere from 200 and up to 250 words.
  13. Finally, you can publish your post.


How to write a post

Writing a post can be achieved in these simple steps listed below.

  1. Navigate to the top of the webpage where you’ll find a black banner.
  2. On the banner, there will be a “+ NEW” tab. Hover your mouse onto this tap.
  3. Once hovering on the “+ NEW” tab, a drop-down menu will appear. In that drop-down menu, there will be 3 options: “Post”, “Media”, and “Document”.
  4. To create a post, click on the “Post” option.
  5. You will now be brought to a page where you will add a title (that would be in bold) and a body section. You can now write the contents of your post.
    1. There are several options to play around with while creating your post. You can change the block style of your work (group blocking, quotations, pull quote and more), create lists, add links, change text color, italicize words, etc.
  6. In order to publish your post, you MUST have a featured image. To add a featured image, on the right side of your device, click on the “Document” tab.
  7. After clicking on the “Document” tab, there is a drop-down option titled “Featured image”. Click on it.
  8. Now select “set featured image”. It will bring you to a screen that will allow you to browse your computer for an image or choose from the media library that contains several images. Choose the one that best suits your post.
  9. Once you’re finished creating your post, you have the option to preview your post. This will allow you to view how your post looks in different formats (desktops, tablet, and mobile).
  10. Once you are satisfied with your post, you can now publish it!

A few things to consider:

  1. You have the option to save your post as a draft. By doing this, you can leave your post as is and then return to it later to edit it, add a few tweaks, and then finally publish it.
  2. You also have the option to add tags to your post. Tags will add labels to your post which can be used as links to posts similar to yours. To add a tag, simply click the drop-down option titled “Tags” and add keywords that best represent your post.
  3. You can select categories for your post to be put in and accessed from. If your post is an assignment, you can select the assignment category to publish your post to. To categorize your post, simply click the drop-down option titled “Categories”, and select what category you want your post to be published in.
  4. You can enable and disable comments, pingbacks, and trackbacks. Navigate to the drop-down option titled “Discussion” and toggle whether or not you want to enable or disable these options.

Creating a post is quite simple! You also have a lot of options to play with in order to enhance your post. Good luck!

How to Post on Our Website

Posting on our site is quite easy!

Firstly, you want to make sure that you are logged into your Commons account. The login will consist of the username and password you created for yourself on the first day of class.

Next, you want to make sure that you are on our class site. Which hopefully you are considering you are reading this post! If you are, next to our course name it will say “+New.” Skip the next step if you see this option.

If you do not see this option, you will need to add yourself to the site. This will be located on the left side of your screen. Continue scrolling until you see the option that should say “Join This Site.”

If you are not currently added to our class site, it will say “Add this Site” in a gray box. Click this option. Once you are added to the course site, your toolbar will expand.

Hover over the “+New” button of the toolbar (Shown in the second image of this post). Click the “Post” dropdown. You will be taken to a new page to begin your post.

Type away and that is how you post! Remember that each blog post is expected to be 200-250 words. In addition, every blog should include a picture to keep our website looking nice.

New Post!

About Posts

This is a Post. Instructors often post announcements, assignments, and discussion questions for for students to comment. Some instructors have students post assignments. Posts are listed on the “Posts” page with the newest at the top. 

Post Comments are turned on by default (see Home for information on Comments).

Add/Remove a password from this post from the Post Editor > Visibility > Edit > Password Protected.

Add/Edit/Delete a post from Dashboard > Posts